05/06/2019

When signing up to Facebook, you create a profile, which is personal to you (find out how to create one here). If other accounts want to see your content, they must send you a friend request, which you can either accept or reject. Only someone who is your friend will see your posts in their feed, along with all their other friends’ and ‘liked’ pages’ content.
Groups are areas on Facebook where individuals must request to join and become a member, in order to see all the posts in that group from the other members, whether they are friends with the other members or not.
A page is the final option and is the best way to present your church. Pages are for businesses or organisations and are open for all to access, so don’t need to be joined or requested. Personal accounts can ‘like’ your page, which means that your church’s content will display in their feed, but even if someone hasn’t clicked ‘like’, they will still be able to view your posts and information.
To set up a Facebook page for your church, log in to your personal account, and then follow these simple five steps:
1. Click ‘Pages’ on the left-hand side of your feed screen, then click ‘Create Page’.

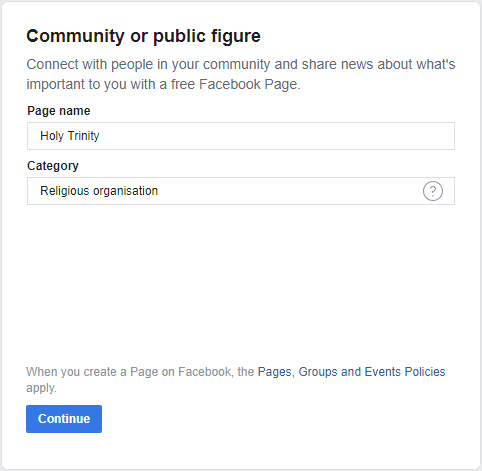
2. Select ‘Community or Public Figure’, then write your church’s name and type Religious Organisation in the ‘Category’ box.
3. Click to upload a profile picture – this is where your church’s logo should go. If you don’t have a logo, read our blog on how to create a logo for free.
4. Click to upload a cover photo – use pictures of friendly, welcoming members of your church, instead of your church building, as beautiful as it may be! Read our blog for some tips on taking great photos in church.
5. You’re in! Click ‘About’ on the left-hand side of the screen and fill in your church’s details. Fill in as much as you can, so your followers can learn all they need to know about you.

6. Make it easy for people to find your page by customising your username. Click on ‘create page username’ underneath your page profile picture. Write in your church's’ name here. Facebook will check to see if it is unique, so you may need to customise it further. This could be by adding your location. For example, @StJohns could be @StJohnsCoventry.

7. Add your opening times to your page by clicking on ‘edit page info’ on the top right of your ‘About’ page. If you are a church that is open throughout the week, include the times here to let people know when they can visit.

8. Add a helpful button to your page to let people contact you easily. Underneath your cover photo, click on ‘Add a button’ and then select what type of button you would like.

After you have followed the steps above, explore the other options available to you from the sidebar, and publish your first post.
Have a look at our other blog posts for more Facebook tips.
Iso Neville
Social Media Officer
Keep up to date with all things digital and join our Labs Latest newsletter. Subscribe here