02/05/2019

For example, if you are planning a holiday club, you may want to boost a post promoting the club, reaching parents with children of the right age in your area.
In this blog, we take you through the steps to boost a post with an image or video on your Facebook page.
1. First, select the post you would like to boost. Click on the blue ‘Boost’ button at the bottom of the chosen post. It must be a post you have created – not a post you have shared from another page.

A new window will open, next to a preview of what your boosted post will look like in the newsfeed.
From here you will be able to customise the advert.
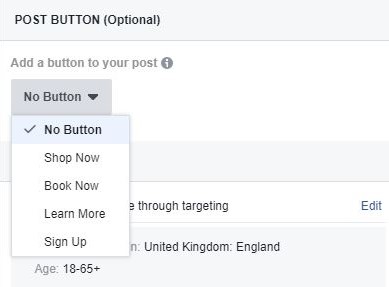
2. Post button. Select a button for your boosted post. If you are advertising an event you could add a ‘Sign Up’ button, or if you want people to look at a page on your website you could add ‘Learn More’. When selected, another box will open where you can add the link to your website or A Church Near You page for the button.
3. Audience. Now choose who you would like to reach with your boosted post. You can select ‘People who like this page’, or ‘People who like this page and their friends’. We recommend you choose ‘People you choose through targeting’ and then ’edit’. This will open a new window where you can define who you would like to reach.

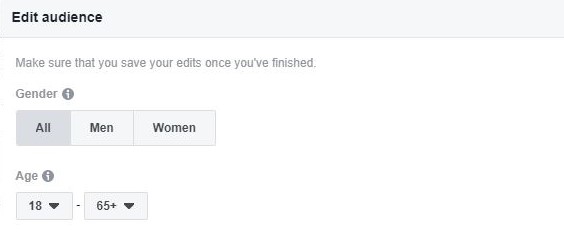
4. Edit audience. Select the age range or gender you are trying to reach with your boost before moving on to defining a location.
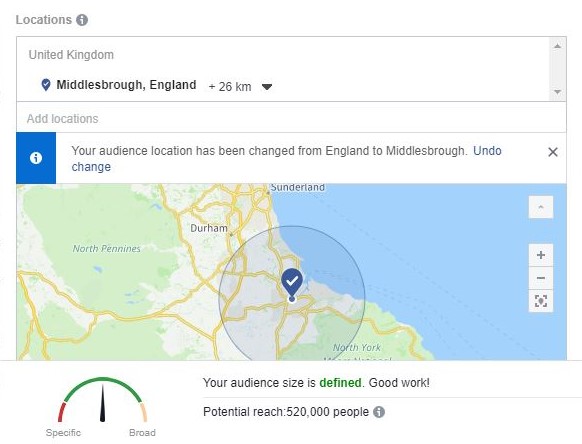
5. Location. Type your desired location into the text box. As you do, a map will appear with your defined area selected. You can choose how far you would like to reach by editing the distance.
6. Interests. Next, move on to adding some interests by thinking about people you are trying to reach to help Facebook find the right people for you. You can add the interests by writing them in, or by browsing the categories already listed. Be specific and choose a range of interests - not just three or four - to help you get better results.

7. Look at the gauge at the bottom of the ‘Edit audience’ window. If you are in the green zone, this shows that your advert has the potential to reach a good range of people based on a defined audience. If you are in the red zone, you may have been too specific, and so may not be able to find people who match all the interests you have selected. Go back to your selected interests and edit to find a good balance.

Click ‘Save’ on this window before returning to your advert.
8. Automatic Placements. After this, choose where you would like your advert to show by turning off ‘Automatic placements’. Choose if you would like your advert to show on Facebook and Instagram, or just Facebook.

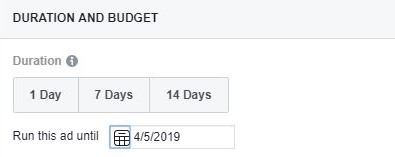
9. Duration. Pick the duration for your advert by selecting a date you would like it to finish. You could choose a couple of days, or even a week.
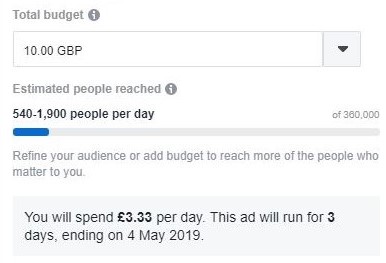
10. Next, go on to choose your budget. Edit the amount you would like to spend over the dates you have selected. Facebook will estimate the number of people you could potentially reach based on your budget and your selected audience. This must be a minimum of £1 a day.
11. Finally, select your method of payment and then press the blue ‘boost’ button.
There will be a delay between pressing boost and going live. This is so the boost can be checked by Facebook, but you will receive a notification to let you know when it has gone live.
Facebook will let you know how your boost is progressing in daily updates. If you would like to see for yourself, click on the small arrow in the top right of your browser where a menu will open. Once here, select ‘Manage ads’ and you will be able to view your boosted post.
If you would like to learn more about Facebook or Instagram advertising take a look at Facebook Blueprint.
Liz Morgan
Church Digital Champion
Keep up to date with all things digital and join our Labs Latest newsletter. Subscribe here