15/03/2024
Many churches and communities use Mailchimp for email communications. While Mailchimp is an intuitive and high-quality platform, it is based in the US. Right now, many churches are re-examining their GDPR policies and obligations and are choosing to migrate to platforms based in the UK or EU. This is to ensure the highest level of compliance with GDPR that they can achieve.
Brevo’s Marketing Platform is an email communications platform based in the EU. It allows you to control the process of sending emails on behalf of your church, from gathering sign ups to sending the email. In Brevo, you can collect your contact information, easily design professional-looking emails and send those emails to your contacts. You can also view your email analytics in Brevo.
Because Brevo is based in the EU, it is more GDPR-compliant than Mailchimp. As a result, many churches are choosing to move their contact data from Mailchimp to Brevo.
In addition to this, Brevo has a user-friendly interface, easy-to-use tools and lots of e-learning courses to help you get familiar with the platform. Finally, Brevo is more cost-effective than Mailchimp, as pricing is not based on how many contacts you have.
If you’re moving from Mailchimp to Brevo, data migration is something that will require careful planning and consideration. It is important not to lose your data in the process. Talking about moving your data from one platform to another is one thing, actually doing it can be another! Many people feel daunted by the prospect and therefore may put off doing it, so let’s demystify the process.
Before the migration
Brevo provides a free way to migrate your contact data from Mailchimp. Before you migrate your data though, you need to do the following:
- Sign up for a Brevo account
- Make sure your contact list(s) in Mailchimp is complete and cleaned. This means:
- The contact details are up to date
- Your list(s) only contains contacts who have consented to receive emails from you
- Create contact attributes in Brevo to match what you used in Mailchimp
- Most Mailchimp attributes have a Brevo equivalent but some do not. Check this Brevo help article for more information.
- Make note of what contact attributes you are using in Mailchimp and if you need to create any custom ones in Brevo to match these, go ahead and do this now.

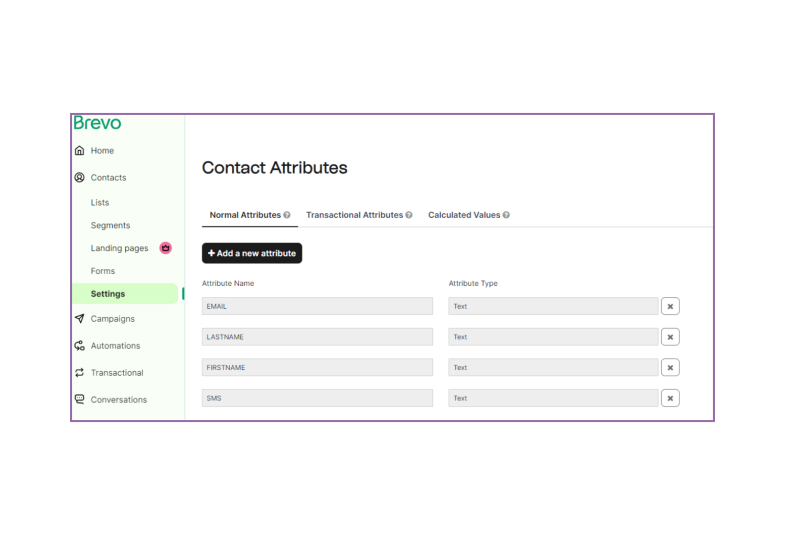
Contact attributes can be found under Contacts/Settings

There are 5 different Attribute Types: Text, Date, Number, Category and Boolean (this means the Attribute can be set to true or false)
Check whether Mailchimp is connected to your website
Do you have an automated sign up form on your website that links to Mailchimp? If yes, you will need to replace this with a Brevo connection in the migration process.
Disconnect this before you start the migration process. That way you won’t miss any sign ups! It may be wise to put in some holding text on your website saying that newsletter sign ups will be available soon.
What are contact attributes? They are the different fields that appear when you look at each contact, for example: first name, last name, mobile number, email address, postcode. You do not need to have every single contact attribute filled in; it depends on what information you need to collect for your particular situation. Some contact attributes are automatically created by Brevo but you can create custom ones. You can find more information on contact attributes here.
Data migration steps
Now it’s time to migrate your data from Mailchimp to Brevo! Follow these steps:
- Make sure your Brevo account is set up: fill in the basic information and complete the registration to activate your account
- Check your data in Mailchimp is up to date and ready to migrate.
- Check you have the contact attributes you need all set up in Brevo. This will keep your list(s) intact and prevent any data loss.
- Configure your Mailchimp-to Brevo data integration. This can be done through Brevo. You will need to authorise access between Mailchimp and Brevo, choose which lists to migrate and then match up the contact attributes so all the information ends up in the right fields! Brevo provides a step-by-step video tutorial for this.
- Check your contacts in Brevo to make sure all the data is there. If there are any errors or inconsistencies, now is the time to fix it so it doesn’t negatively impact you further down the road.
- If required, connect your Brevo account to your website. If you had a connection between Mailchimp and your website, replace it with a Brevo connection. Find more information on this here. That way you can activate a sign up form on your website!

For more detailed information and a step-by-step video tutorial, complete this course from Brevo.
After the migration
Once you’ve migrated all your data you can now use Brevo to send emails to your contacts. Take some time to get used to the new platform. Brevo provides many written articles to help you with any questions you may have.
Once you’re underway with Brevo, it is wise to delete your Mailchimp account. The data in there will soon be out of date and if you’re a paying customer there is no need to spend money on a platform you aren’t using any more! Also, from a data security perspective, it is best to have your contact data stored securely in one place, which is now Brevo.
- Laura Bligh, CRM and Analytics Manager


